Merchant Portal
Introduction
When processing online transactions, it’s important to keep track of your financial operations. Our Merchant Portal is an intuitive dashboard to manage your transactions.
It allows you very easily to
- Get a comprehensive picture of your transactions processed through ANZ Worldline Payment Solutions.
- Look up payments by various parameters (payment method, amount, currency etc.) and perform maintenance operations.
- Configure the API credentials for authentication and webhooks.
Access Merchant Portal
Access the Merchant Portal via the login page. Depending on the environment you want to access, you have to open the respective URL:
If this is your first login, you have to set up two-factor authentication. Once you have entered your correct password, follow the instructions on the subsequent screen. You need to install a two-factor-authenticator on your mobile device, which you will use to scan the QR-code on the login screen. Your mobile device will then provide you with the one-time code.
Depending on your choice, differences apply.
Authy
- Download the app from the app store.
- Install the app by registering with your phone number and your e-mail address.
- Follow the app instructions to create an Authy account: You receive a confirmation code in your e-mail inbox which you enter in the mobile device.
- Scan the QR code on our login page.
- You receive the one-time code. Enter it in the "One-time code" field on our login page.
5'(optional). Enter a "Device name" for your mobile device you use for two-factor authentication.
Google authenticator
- Download and install the app.
- Scan the QR code on our login page to add your Merchant Portal account to the app.
- Enter the one-time code from the app in the "One-time code" field on our login page.
3'(optional). Enter a "Device name" for your mobile device you use for two-factor authentication.
Microsoft authenticator
- Download and install the app.
- Choose the option "Scan QR code" in the app.
- Scan the QR code on our login page.
- Enter the one-time code from the app in the "One-time code" field on our login page.
4'(optional). Enter a "Device name" for your mobile device you use for two-factor authentication.
Once you have logged in, you have access to the following tabs via the side menu:
If you have lost your password, reset it by following the instructions in our dedicated guide.
Understand Dashboard tab
The "Dashboard" tab provides you a condensed overview on your cash flow, with links to other tabs for quick actions.
| Module | Description/Possible actions |
|---|---|
| Transaction overview |
A graphical representation of incoming transactions per
|
| My transactions |
Combined value of today’s processed transactions, regardless of the transaction status. Hence, this sum also includes unsuccessful transactions (statusOutput.statusCode=0/1/2 etc.), authorisations (statusOutput.statusCode=5) and refunds/cancellations (statusOutput.statusCode=6/7/8 etc.) Click on "View transactions" to go to the "Transactions" tab for a detailed overview |
| To capture |
Combined value of all transactions in statusOutput.statusCode=5 you still have to capture. |
| Transaction this week Transactions this month Transactions this year |
Combined value of all transactions within the respective period in the respective currency |
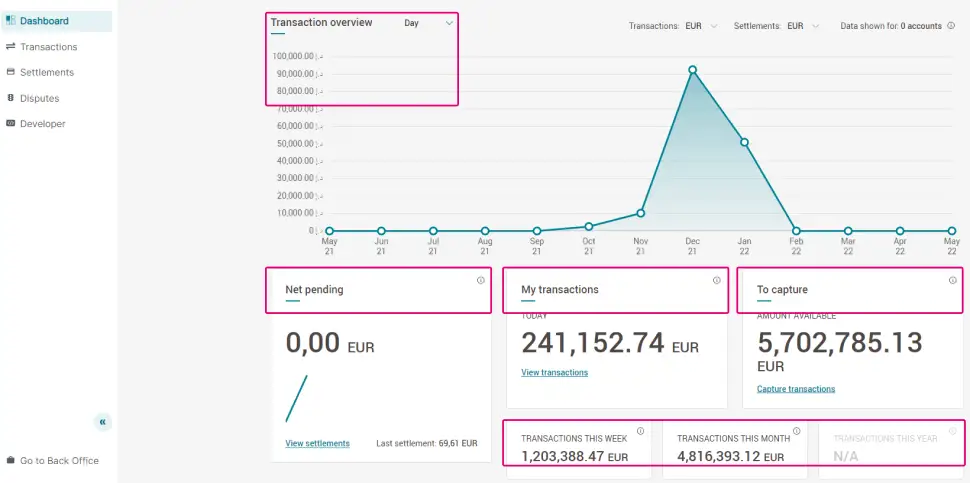
This is an example of the user interface. The available currencies depend on your configuration, region and transaction context.
Understand Transactions tab
Here you can filter your processed transactions by one or more of the following parameters. This allows you to quickly look up transaction(s) and/or perform actions (i.e. captures, refunds) on them, even on transaction bulks.
Look up transactions
| Parameter | Description |
|---|---|
| From...to... |
Select a time period up of up to 18 months. The transaction’s timestamp refers to the date/time when it was authorised (statusOutput.statusCode=5 or 9 for direct sales / Status="Authorized" or "Payment requested" for direct sales). For unsuccessful transactions (i.e. statusOutput.statusCode=0 or 1 / Status="Invalid or incomplete" or "Cancelled by customer", the timestamp refers to the moment you request reached our platform/your customers cancelled the transaction. |
| Merchant reference |
Your identifier for the order (The value you sent in property order.references.merchantReference). Also accepts wildcard characters. To look up i.e. "abc-123", enter "%-123". |
| Payment method | The payment method the transactions were processed with. The content of the drop down menu is identical to your active payment methods. |
| Amount | Value you sent in property order.amountOfMoney.amount. |
| Status | The human-readable, string-based global transaction status description. Find a complete overview of all possible statuses in our dedicated guide, including a mapping for the numeric property statusOutput.statusCode . |
Learn more about the global transaction status and individual maintenance operations in chapter "Understand transaction overview".
Once you have applied you filter, you can access detailed information for any transaction by clicking on the "Merchant reference".
Understand transaction overview
Find here a detailed overview of individual transactions and the possibility to perform maintenance operations on them.
By clicking on the "Action" drop down button and filling in the amount field, you can perform (partial) captures, refunds and authorisation cancellations. If you want to perform the same action to more than one transaction, learn how to do this in the “Perform bulk actions“ chapter.
The fields displayed in the overview contains valuable information about the overall status and the transaction’s history. Some of them are self-explanatory, but some require a deeper understanding to get a full picture:
| Parameter | Description |
|---|---|
| Merchant reference | Your identifier for the order (The value you sent in property order.references.merchantReference). |
| Payment ID | A unique technical reference number our platform automatically generates for each transaction. |
| Authorization Date | The timestamp the transaction reached status (statusOutput.statusCode=2/5/9). |
| Fraud score | Our Fraud Prevention Module’s risk assessment. |
| Status | The human-readable, string-based global transaction status description. Find a complete overview of all possible statuses in our dedicated guide, including a mapping for human-readable, string-based status and the numeric propertystatusOutput.statusCode. |
| History |
Provides a list of individual maintenance operations (i.e. authorisations/captures/refunds) you have performed on the transaction, either via the Merchant Portal or the ANZ Worldline Payment Solutions API. Each maintenance operation shows individual data of
|
Learn more about the global transaction status and individual maintenance operations in a dedicated chapter in our Webhooks guide.
Perform bulk actions
If you want to perform maintenance operations on a bulk of transactions at once, the Merchant Portal allows you to do so easily by following these steps:
- In the Transactions tab, flag individual transactions for which you want to perform the same maintenance operation. You can apply filter “Status” or any other parameter to help you filter out transactions.
- From the drop down menu "Bulk actions", select one of the following actions:
a) "Capture amounts": Capture statusOutput.statusCode=5 transactions to turn them intostatusOutput.statusCode=9 .
b) "Refund amounts": Refund statusOutput.statusCode=9 transactions to turn them into statusOutput.statusCode=8 .
c) "Cancel authorizations": Cancel the authorised amount for statusOutput.statusCode=5 transactions to turn them into statusOutput.statusCode=6.
Find a complete overview of all possible statuses in our dedicated guide.
Understand Create payments tab
This tab contains our code-free solutions for processing transactions.
Understand Payment requests
Find here a detailed overview of individual transactions you have processed using our Pay by Link feature. Read our dedicated chapter to learn more.
Understand Generate link feature
Create a payment link you can share with your customers with just a few links. Read our dedicated guide to learn more.
Understand Developer tab
Configure your account to link your webshop/ordering system to our platform via one of our integration methods. This is the basis for working with our e-Terminal module, SDKs or plugins.
Understand Payment API feature
One of the requirements to process transactions is the configuration of authentication credentials. Learn in our dedicated Authentication guide how to configure them.
Understand Webhooks feature
Webhooks allow our platform to automatically update your transactions’ status in your webshop/ordering system. Learn in our dedicated Webhooks guide how to do this.
Understand Branding feature
If you are using our Hosted Checkout Page or PayByLink solution, you redirect your customers to our secure payment page during the payment flow. To smooth out the transition, you can customise the look and feel of this secure payment page. Follow the instructions to create a template.
It is also possible to customise our secure payment page directly in the Merchant Portal via this interface:
| Parameter | Description |
|---|---|
| Merchant name |
Your company name appearing in the header of the secure payment page. |
| Brand color |
The hexadecimal colour code of the payment button on the secure payment page. |
| Variant name | The file name of your template. Equivalent of the createHostedCheckoutRequest.hostedCheckoutSpecificInput.variant property value sent in CreateHostedCheckout requests. |
| Logo | Your company logo appearing in the header of the secure payment page. |
Understand Business Tab
Activate and manage the payment methods you want to make available to your customers. You can activate the following payment methods:
Activate and manage payment methods
To activate a payment method from the "Not Active" list, fill in the payment method-specific credentials you have received from the payment method provider. Click on "Activate". The payment method is now active and ready for transaction processing.
De-/reactivate any of your payment methods via the slide switch or update the credentials via the "Update" button.
- You can activate any available payment method in the test environment anytime by entering placeholder data.
- Contact us to (de)activate any other payment method for you in either the test/live environment.
Manage team tab
In "Manage team", you can
- Create and manage existing users
- Define their roles and access rights
in your account.
Learn in our dedicated User Manager guide how to do it.