BigCommerce
Introduction
Our BigCommerce plug-in comes with regular updates and full integration support, offering a versatile out-of-the-box solution to accept online payments easily:
- Supports both Hosted Checkout Page and Hosted Tokenization Page integration methods
- Accepts payment operations (Refunds, authorizations, captures etc.) directly from your ANZ Worldline Payment Solutions account.
Keep an eye on our Release Notes to stay informed about updates and new features (i.e. payment methods, features, integration methods) we have added to this plugin!
Download plugin
Account Creation
To process transactions with this plugin, you need an account on our platform.
This plugin works with both our test and live environments. A test account is a great way to get familiar with both the plugin and our platform. Once you want to go live, contact us!
Installation
Installation
The first step to use the plugin is the installation process. Before you proceed, make sure your infrastructure meets these system requirements:
| Item | Description |
|---|---|
| Plugin package | |
| Direct ANZ Worldline Payment Solutions credentials |
|
| BigCommerce | No specific requirements, compatible with every store. |
| PCI compliancy |
SAQ A |
Once done, follow these steps:
- Go to Apps > Marketplace. Click on the “BIGCOMMERCE.COM/APPS” button to access our app store. Search for "Worldline Online Payments" and click on the "GET THIS APP" button.
- Login to the BigCommerce Back Office. Go to Apps > Marketplace. Click on the “Install” button and follow the installation instructions.
Configuration
After the first installation, a wizard will guide you through the different configuration steps to link your store to the platform. After the installation, you will be able to amend this configuration by clicking on the “Settings” button within the app.
Configure "Connection" settings
In this screen, you will be able to configure the credentials needed in order to connect with the Worldline platform.
| Property | Description/Actions |
|---|---|
| Mode |
Select between "Sandbox Mode” or "Live Mode” to link your shop to the respective environment and to configure the respective test/live credentials. Depending on your selection, the shop module will send the transaction requests to the test or production environment. Make sure to:
|
| PSPID |
Enter your test/live PSPID from our platform that you want to use for transaction processing. |
| API Key |
Enter the API Key of your test or live PSPID. Read our dedicated guide to learn how to generate one. |
| API Secret |
Enter the API Secret of your test or live PSPID. Read our dedicated guide to learn how to generate one. |
| Webhook Key |
Enter the Webhooks Key of your test/live PSPID from the Merchant Portal as described in our dedicated guide. |
| Webhook Secret |
Enter the Webhooks Secret of your test/live PSPID from the Merchant Portal as described in our dedicated guide. |
| Webhook URL |
Copy this URL into the Endpoint URLs fields in the Merchant Portal as described in our dedicated guide. |
Click on "Save changes” to confirm and validate your settings by establishing a test connection between the plugin and our platform.
If an error appears in the top right of screen, contact your system administrator for troubleshooting to check:
- You are using the correct credentials
- Whether your PSPID is active
- You send the request to the correct PSPID/environment (Test vs Production)
Configure "General settings"
In this screen, you will be able to configure the general settings that will be applied to all payment requests sent to the Worldline platform.
| Property | Description/Actions |
|---|---|
| Payment action |
Choose between Authorize & capture and Authorize :
If you select Authorize, also configure the following Automatic capture setting.
|
| Automatic capture |
The system can automatically capture transactions that have been authorized after a certain |
| Enable 3-D Secure authentication |
Modify to setting to disable 3-D Secure for all cards transactions. We strongly recommend to leave |
| Authentication for low-value baskets |
If you have enabled 3-D Secure authentication, you can enable this option to request the issuer exempted for a maximum total amount of 150 EUR. This means that the next one not fulfilling those criteria will by default be strongly authenticated. |
| Enforce strong customer authentication for every payment |
If you have enabled 3-D Secure authentication, you can request every transaction to be |
| Vault title |
Customize the radio button text in your checkout next to the saved card of your customers. |
| Payment accepted status mapping |
Map successful transaction statuses according to your business logic. |
| Apply surcharge |
In some countries, the merchant is allowed to request additional fees to process credit |
| Debug mode |
Enable this feature to log additional data for payments requests and responses. |
| Logging records lifetime (day) |
Define in days for how long the debug logs are retained. |
Do not forget to click on Save Changes once you have modified any configuration on this screen.
Configure “Payment methods”
In this screen, you will be able to configure the specific settings of the different checkout options we offer and the payment methods you may be using.
|
Property |
Description/Actions |
|
Credit cards (iFrame) |
Configure/Enable/Disable card payments via Hosted Tokenization Page integration method Your customers stay in your webshop checkout page while entering their card details
|
|
Hosted Checkout (Redirect to Worldline) |
Configure/Enable/Disable both card and non-card payment methods via Your customers confirm the order in your webshop checkout page by clicking on the |
|
Redirect Payment |
Configure/Enable/Disable both card and non-card payment methods via Your customers select a payment method and confirm the order in your webshop
|
When you have activated the “Credit Cards” checkout
Configure the following properties :
- Payment method name : customize the text displayed next to the radio button on your checkout page.
- Template file name : define the name of the template to use to customize the design of the iFrame you will embed in your checkout page. If this field is left empty, the default design of the payment page will be used.
When you have activated the “Hosted Checkout” checkout
Configure the following properties :
- Payment method name : customize the text displayed next to the radio button on your checkout page.
- Template file name : define the name of the template to use to customize the design of your payment page. If this field is left empty, the default design of the payment page will be used.
- Enable group cards : Group all cards payment methods under one single button on the payment page.
- Update logo : update the default logo displayed next to the radio button on your checkout page.
When you have activated the “Redirect Payment” checkout
Configure the following properties :
- Template file name : define the name of the template to use to customize the design of your payment page. If this field is left empty, the default design of the payment page will be used.
- Oney3x4x payment option: configure the value as agreed between you and your acquirer to determine whether the payment is split in 3 or 4 instalments.
- Session timeout: configure the timeout that will be applied to the payment page. After the configured value (in minutes), the payment on the payment page will not be possible anymore.
- Direct Debit Recurrence Type : define the type of recurrence to be applied when performing a Sepa Direct Debit transaction. Possible values are :
- Unique : the transaction is not part of a sequence of recurring payments.
- Recurring : the transaction is part of a sequence of recurring payments.
- Direct Debit Signature Type : define how your customers will sign the mandate allowing you to take money of their account while using Sepa Direct Debit payment method. Possible values are :
- SMS : The mandate will be signed via SMS
- Unsigned : The mandate will not be signed
- Bank Transfer by Worldline instant payments only : Enable this feature if you want to only accept instant payments for the Account-to-Account (Bank Transfer by Worldline) payment method.
- Available payment methods : Select a list of payment methods you wish to offer as individual payment buttons on your checkout page.
Manage Payments
We have designed the plugin to follow-up on your orders automatically and autonomously, freeing you from the administration involved. Learn here how to use our plugin effectively which could help your business to thrive!
Perform Maintenance Operations
Captures and refunds of authorisations are standard processes (maintenance operations) in your everyday business logic. Learn here how to perform these operations directly in the BigCommerce Back Office:
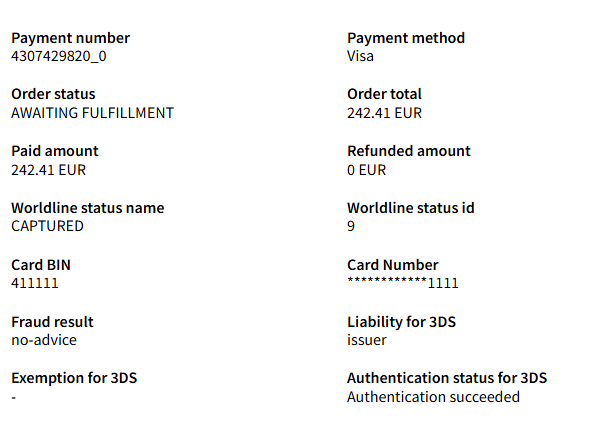
- Login to the BigCommerce Back Office. Go to Apps > My apps > Worldline Online Payments > Orders.
- In the order overview, depending on the "Order status", several actions are possible by clicking on the three dots:

- Refund : Define the amount you wish to refund. You cannot make a refund that is of a higher value than the initial payment. You will also see the available amount for refund.
- Cancel authorization : Define the amount authorized you wish to cancel. You cannot cancel an amount that is of a higher value than the initial authorization. You will also see the available amount for cancellation.
- Capture : Define the amount authorized you wish to capture. You cannot capture an amount that is of a higher value than the initial authorization. You will also see the available amount for capture.
- Details: You will be able to see some valuable details in this section, like the BIN of the card, the liability in case of 3-D Secure, the Worldline PAYID, the fraud analysis result.